I've been slow on updating the progress of my preparation. I have now 3 days remaining to finish any preparation. All that is left to do is bleeding brake and clutch fluids. If time permits, I can make the car pretty for the event.
As of this past week, the front splitter was complteted. I coated it with flat black paint and a layer of Varathane clear polyurethane just for some water resistance. The center section of the TRD lip was filled with expanding foam and shaped to the contours of the rest of the lip to keep air from being trapped.
To comply with regulation, a catalytic converter was installed. I chose Magnaflow's spun metallic catalyst for it's small size of only 4"x9". Joseph of Midnight Squad did the welding work on the exhaust which came out beautiful. HE IS TOP CLASS WELDER. Total weight of entire system was less than 10 lbs. The new exhaust installed is very loud. Resemblance of a dc2 with buddyclub spec2 exhaust. My ears bleed.
The last piece to be created was the rear diffuser. Brian and I had spent much time discussing the design of this piece. The old diffuser was better suited to a unmodified bumper and looked rediculous on the modified bumper I installed. Substantially noticable difference is the width, now almost doubled. For now it is sitting nicely, but perhaps during the week I will add more fins.
I've just now had something exciting come up that pushed me to write to you again. Just last week I signed up for the Redline Time Attack which will be held at Buttonwillow Raceway on March 29th. This is the real test to see if my home built car is capable of delivering competition worthy of mention.
I researched information about last year's competitors as well as the regulations for each class of competition. The way the car sat would place it in modified class, which was dominated by baller ass shops such as Evasive Motorsports, so it left me no choice. I had to comply to meet a level of competition I can stand a chance with. So it begins.
The two things that held me back were tires and a catalytic converter. I was able to come up on a set of re01-r for cheap and replaced the rear r888 on my Enkei rpf1's. The front tires are now hankook rs2. They are now mounted, balanced, and installed on the car. the catalytic converter is one tough job. The RTA rulebook says a catalytic converter must be installed on the vehicle, but does not have to be in the factory location. So I began to get creative on the design. My idea was to make the catalyst a part of the axleback, this way I can swap the muffler out if need be without having to sabotage the midpipe. Catalyst is not complete yet but parts are on their way and I hope not to worry.
Aside from the necessities to compete, I'll be tackling past issues. I will be working on the aerodynamics department very much for RTA. The car suffered from understeer due to unbalanced aerodynamics of the rear wing and lacking of a working front splitter. This time, version 2, will be more developed and braced properly to ensure stability. The splitter again will be made of 1/2" plywood. Additional brackets were installed to support the stabilizer rods to the splitter. Also it will be bolted at 8 different locations between the bumper and the splitter. To keep air from being trapped in the center indentation on the lip, I have filled the void using greatstuff expanding foam, purchased at homedepot. Just a note, wear gloves when working with this stuff.
The rear bumper has been cut in half horizontally to eliminate as much drag as possible. The way it looks is raw. I can't help but think I need to make a new rear diffuser to give it a more complete look. I will look further into designing a new diffuser if necessary. Also new is installed brake ducts. Although using carbotech xp8 pads on a light car, I had experienced brake fading before. This light weight addition will help cool down the brakes after heavy use in the front and rear straightaway. I am very proud of this work.
I will be updating the work log as work progresses. For now enjoy these few of recent work...
this is the first few cuts i made on the plywood for the splitter.
it starts to take form, complete with adequate spacing for the tire to maneuver.
the splitter mounted on the car without a bumper. i'd really love to drive it like this once.
here shows the newly installed brake ducts, as well as the bracketry for splitter support.
lunch time, dirty dogs!
expanding foam on the lip, very messy work.
my attempt at bodywork and paint. just fixing a few blemishes from 2 years ago.
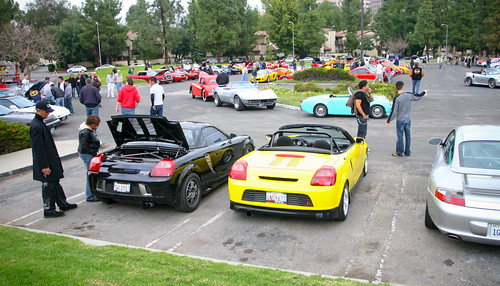
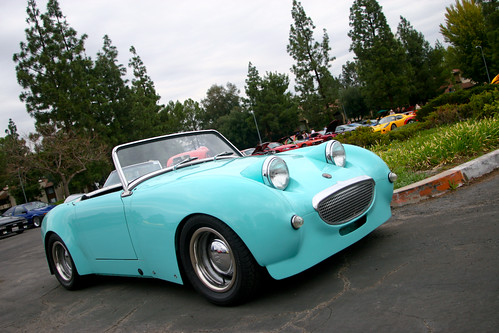
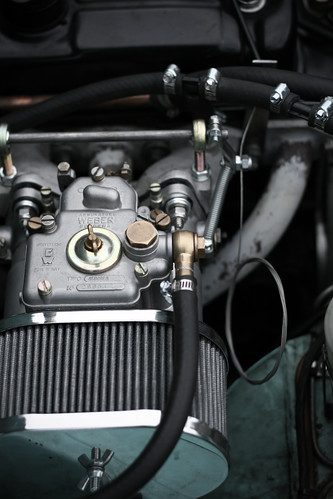
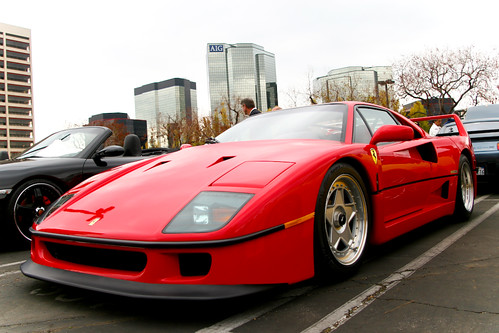
kenchi's garage, hard parking yet again. brian and i showed up to this years motors 4 toys show in woodland hills. it's like a cars and coffee meet, but bigger. the car show was free to enter but they do ask that you bring an unwrapped gift which were collected to be given to needy children. for rich fools, they had a lapd motorcade for you to haul ass down to toysrus to buy 50$ in toys to be put in the toy drive. i brought a toy so i did not partake in the motorcade. the lot was filled mostly with ferrari, lotus, porsche, and classic american cars. there was a row of ae86 i parked next to. brian and i were the only mr-s there, and there was 1 aw11. by far the dopest car there was a light blue austin healey sprite. the owner runs weber carburetors and original drums were replaced with disk brakes on all 4 corners. in the bike department, a carbon fiber framed gsxr stole the show. the fuel tank was integrated within the carbon exoskeleton which also covered up most of the mechanics and acted as the seat. the weight lost extracted from the original chassis was approximately 150lbs. the engine was bored to 1300cc has seen speeds of 210mph limited by gearing. it was one of the craziest bikes i had seen. attending this event made me feel joyed that i was able to give a child something to look forward to this christmas. my donation was a keyboard piano. one which i also had as a child. you can record for a minute and play back what you played. know what, i might go buy another one just for myself. :p
The night before, seanjay came by to rest up for the big day ahead. I too was excited for the event. We had set our alarms to go at 4:30am. Let this video entertain you.
The snoring had begun long before I even thought of getting the camera. I was awaken by this snoring while I was dreaming that seanjay had beaten everybody in miatachallenge and won all prizes (weird dream i know). I then realized it wasnt seanjay who was making the noise because he sat up and started looking around as I was doing the same to figure out what was making this noise. I look to my left and it was my sister's friend who had stayed over from sandiego.
Sean said,"this has to be a joke". I said,"Goddamn we have just one hour to go dammit". :'( Sean and I began throwing pillows at him and pushing him pretty good, but the noise continued. As a last resort, I shook his pillow pretty damn good and lmao'd tears of joy. He continued to snore so I decided to wake up and just get ready. We went to Denny's for breakfast and got home just in time for everyone to meet up.
We got to the track at 7am sharp. As planned, we had enough time to unload and setup and still make it to the front of tech inspection line. Miatas were first to hit the track. About 24 of them ranging from street, modified, and unlimited class roamed the track. A black NA with carbonfiber top was amazingly quick. William's red NA was probably the most well balanced miata i saw out there.
I was already encountering problems from the first lap out. The front splitter I just made began to rip the car apart. I had to put to fix the problem. I used a ratchet strap to hook the front of the splitter over the front bumper onto a frame brace. Out on the track again, the sagging was gone but at high speeds the splitter started making woodpecker sounds. So through trial and error, splitter = gone.
In my 2nd session, I managed to run a lap at 1:26.7. That is now my PB at streets of willow. Without the splitter, the car does tend to understeer at higher speed where a splitter would come in handy. I'll probably make a better designed splitter when i have done more research. After targeting the understeer, I replaced the front tires (195/55/15 r888) with my older set of 205/50/15 ra1. I felt tired from the long day I already had. I was already satisfied with the time I set. But I went out for the 3rd session. Immediately I noticed a difference in stability but it still did understeer. This session was by far the worse. Coming out of the bowl is a long straight where 100mph is easily achieved. At the end is a set of chicanes where if targeted correctly, you can go through without turning. I targeted my braking point and aimed for a little bit further. I laid on the brakes just a little bit too late and ended up flying off straight into the dirt at about 60mph. So I pulled in to inspect the car for damage. The only thing I noticed immediately was the front brakes smoking up. That's a good sign that it's working :p. By the time I was ready to go again, the next group up was already being announced so I just stayed in. Good thing though. I opened my engine lid, and the oil cap was missing. Oil was all over the engine bay. This had to happen during my offroad excursion because there wasn't a pile of oil on the ground where I parked before. This put an end to it for me for the day. Driver Taka Aono was kind enough to let me use his oil cap to get home because his car was being trailered home. He is a lifesaver.
In the end, I placed first in 1.6/1.8 liter class. I'm very happy that I made it this far and did so well.
In one year's time, my car has been through so many changes. The exhaust has been changed from a oem celica header and a Magnaflow canister that had been completely blown out, to a LittleRocket header, JNZ downpipe, and Techno Pro Spirits titanium exhaust. Also for shits and giggles, I threw on a no name intake that was about 6 inches long with a HKS foam filter.
So we did a baseline run with the stock intake on and it pretty much ran as well as it did last year when my car first went in. As soon as the no name intake went on, without changing anything at all on the powerfc, 199hp. Now the tuning begins.
Shawn and Daniel started to do their magic and in no time, the car was seeing upwards of 200hp. The longest part was trying to fix the dip in torque between the cam change (lift). Speculation led towards maybe a better cam or perhaps the header design is limiting the flow in that part of the revband.
After the dust has settled and all the smoke had cleared, we came out with this... :)
next up... gotta change the oil in the engine and transmission.
i made me a splitter. 1/2" plywood. not sure what kind of plywood it is but it's really smooth. for now the splitter will keep this rough shape. i'm still in need of more mounting points to assure that it will hold up to the abuse this sunday. also what you see in the picture are my rpf1's with toyo r888 mounted on them. running lotus elise size tires 195/55/15 and 225/50/16. the wheels are 15x7+35 and 16x8+38. the stance is fairly aggressive while staying within the body. does not rub :)
oh yeah... the alignment was done at pepboys :p -2.5, 0-toe / -1.8, +.13deg. car's so stable.
Brian started everything by fixing my front lip using fiberglass. He did a pretty good job and seems to have a better understanding of that stuff than I do. I was working on the front of the car, experimenting on the top strut mounts to gain some caster. This required moving teh top mounts from the driver side to the passenger side and rotating 60 degrees. From the looks of it, i lost .3ish camber and gained .5ish caster. more better for dorifto!
We then started on the brakes. First we got all the old fluid out of the system. Then we went to the rear passenger side and started taking the caliper apart to replace rotors and pads. The nightmare began here. We brought out the "all spark" brake caliper piston twisting tool. From the looks of it, it was working for a little bit and then stopped. The piston kept twisting but wasn't moving back any more. So I removed the caliper completely off the car and put it on a vise to see if I could use the all spark there. Still no luck. After about 40 minutes of wrestling with the damn thing, I decided to go to Autozone to get a real caliper tool while Brian held down the fort.
So I got to Autozone and as I expected, they didn't have the tool. Just as I was cursing Autozone, Brian calls and said he got the piston to retract. It's nuts. One of those things that you just have to give time for it to work. According to Brian, he did nothing out of the ordinary and it just worked. Grr... so much time was wasted for this dumb caliper. The other 3 sides took at most 10 minutes each.
After hunting down Hey Mikeyyyy down for months, I was finally able to stop him and get my hid and racing battery. The hid was pretty much a return for me giving him my Apexi I-Moni. The Buddy Club racing battery is a replacement for the same battery, which died on me earlier this year. It lasted a good 2 years of daily driving.
To install the battery using the factory battery hold, I had to drill some holes to adjust everything to fit. Cutting the factory tiedown rod was also required. I've done this before so this didn't take any time at all. The battery now stays snug and safe.
Replacing the hid kit was a little bit involved. I removed the bumper to gain access to a nut that was holding the headlight housing in place. While I was down there, I removed the washer fluid reservoir, and replaced the factory horns. I almost got ran over the other day by a chevy suburban because he didn't have a passenger side mirror. Seems he didn't even hear my horn either. Finding a place to mount the ballast took most of the time. I found a good place to hide the ballast though it is not completely consealed like my previous setup. the pigtails it came with were completely useless. My wiring harness was 9006 and it pretty much directly went into the ballast (one less wiring mess to deal with).
I really like the color the lights put out. It's not too far from oem and it's not overly flamboyant. Gonna do some road tests. :)
Birds in the air... Flowers blooming... Spring time is here! This calls for some annual cleaning!
... well it's spring in Australia isn't it?
To start this off, Here is what the garage looked like about 20 minutes in. It didn't look much different from this before I started but I assure you it was inaccessible.
The main thing I wanted to focus on was fitting my tire trailer in a way that it wouldn't be a burden. I started by removing everything off the shelves and put everything to the other side of the garage. Then the shelves were pulled away from the wall and I began sweeping near the walls. It was a mess. Most of it was taken care of with the shop-vac. There was even a lizard thing in there crawling around somewhere. It scared the hell out of me and I accidentally dropped a block of wood on it.
After all was swept, I questioned to myself, "where should I put things?". About 10 minutes later I went back to moving shelves and putting things on them. Just a few minor changes in where the shelves went. I am not 100% satisfied with the placement of everything but it's maybe 85%. I still need to build some things on the wall to be able to hang stuff. I want to hang my wing on so that it is out of harm's way. Quite possibly there might be a tire rack in the future. There's just a couple other little things that are extremely time consuming. I really need tupperware!
Now there is space to walk between the car and the aisle without worrying about damage. 4 hours of work, so rewarding.
Oh yeah... How much of this shit does one need? :p


 view the full album